E-Riderrs User Manual
Congratulations on your purchase of the E-Riderrs electric bike! This manual is designed to provide you with all the information you need to use and maintain your bike safely and efficiently.
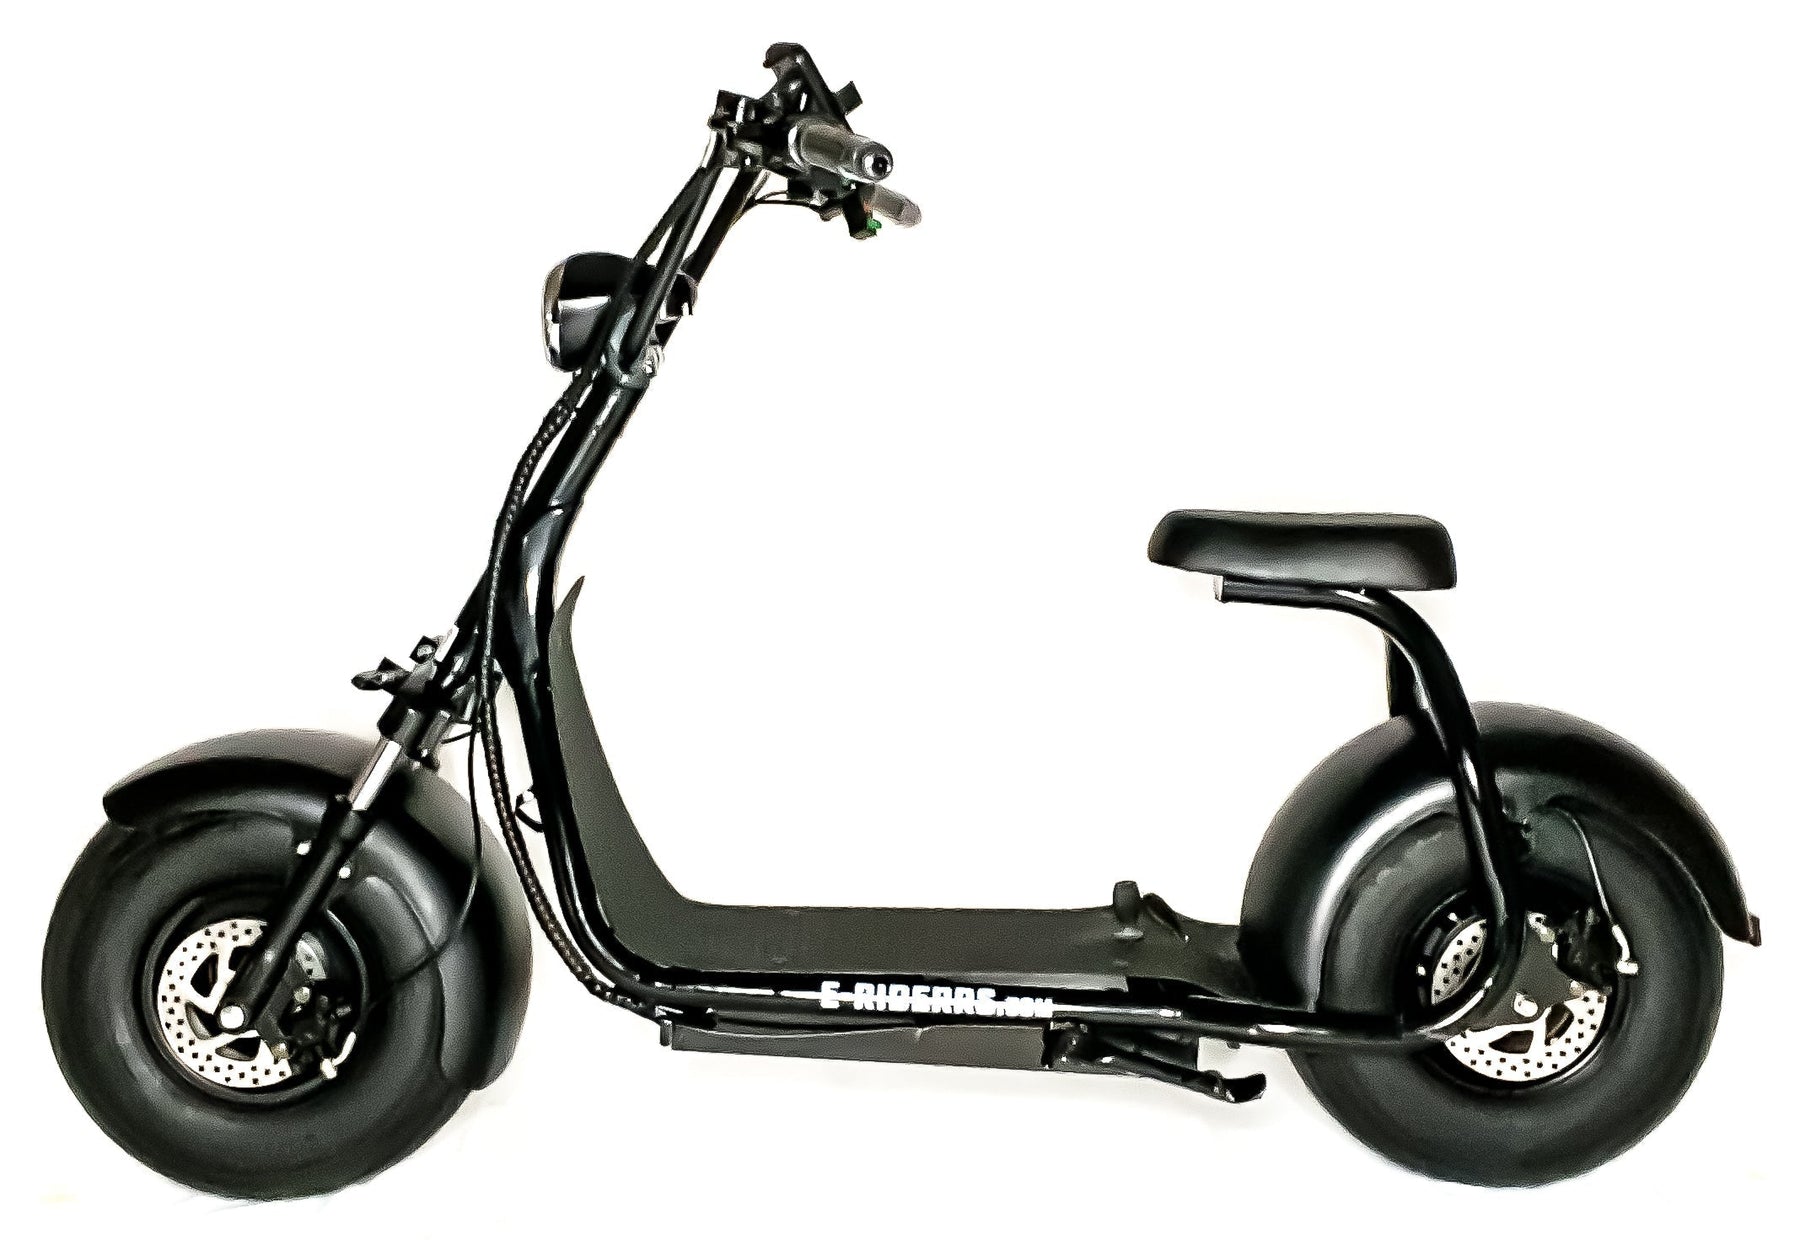
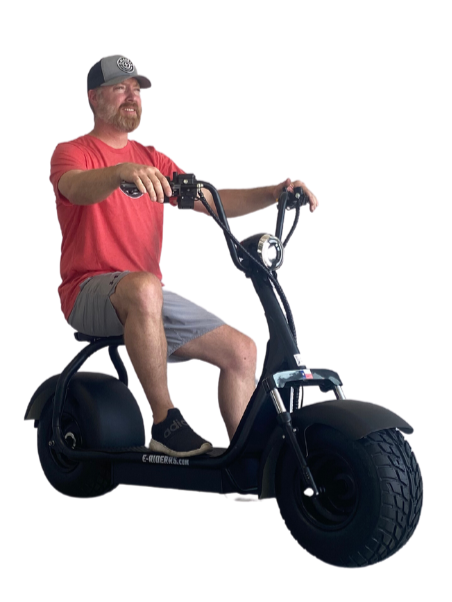
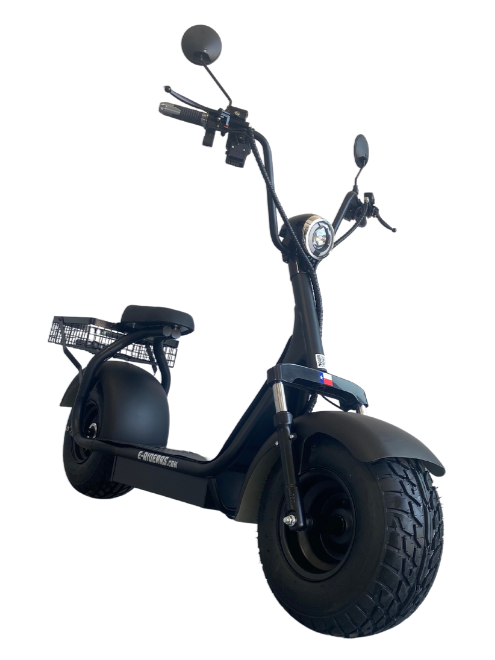
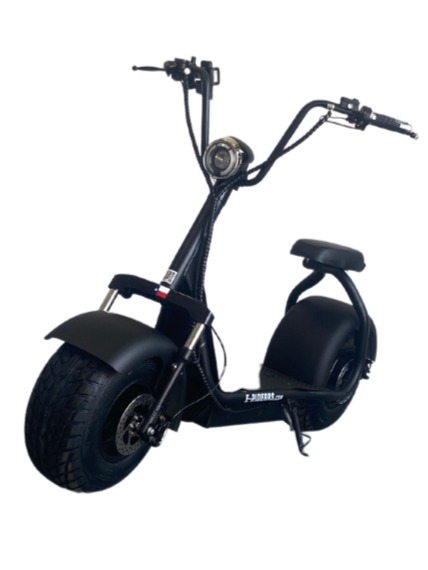
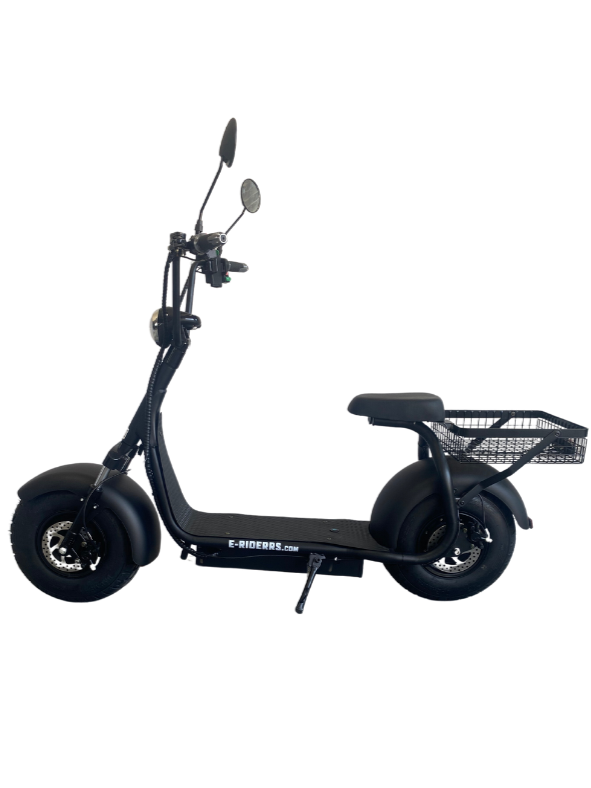
Introduction to E-Riderrs: E-Riderrs was carefully designed to combine fashion with a casual appearance, offering a unique style with a simple yet extraordinary structure. Its noble and amiable nature is sure to captivate you at first sight. Let's explore the main characteristics of the E-Riderrs:
E-Ridders Diagram

-
Lithium Battery: The E-Riderrs comes with a lithium battery that has passed the safety tests of UL and CE certification standards, ensuring safety and reliability. The lithium battery's service life is three times that of a lead-acid battery, making it ultralong-lasting and eliminating the need for frequent replacements. Additionally, the lithium battery is lightweight, weighing only 1/3 of a lead-acid battery, contributing to the bike's overall lightweight design. This battery provides high voltage, powerful gradeability, and quick acceleration, making it a high-energy option. Moreover, it's recognized as a green energy source, producing no pollution during production and use.
-
Battery Compartment: The battery compartment is located in the center below the floorboard, offering balanced force, a small and light volume, and high safety and secrecy.
-
Motor: The E-Riderrs features an optimal magnetic steel material, high-quality silicon steel sheet, thicker coil, precision bearing, and a thick and large motor shaft. This powerful motor provides high bearing capacity and durability, ensuring a strong and smooth performance.
-
Tire: The tires of E-Riderrs are designed using 3D virtual design and assembly, fully automatic numerical control bending pipe technology, and automatic machine welding. The high-quality rubber ensures a safe and comfortable ride, whether sitting or standing. It also enables convenient cargo carrying.
-
Frame: Similar to the tire design, the frame is also created using 3D virtual design and assembly, fully automatic numerical control bending pipe technology, and automatic machine welding.
-
Disc Brake: The E-Riderrs is equipped with a small and exquisite oil disc brake, featuring an aluminum alloy pump body forged using advanced technology and advanced CNC processing. This setup provides flexible braking and smooth action, ensuring safe stopping when needed.
-
Handlebar: The streamlined human body engineering leisure design of the handlebar provides a tough and firm grip, allowing for easy and free control while riding.
-
Rolling Handle: The rolling handle features soft rubber molding injection, offering a comfortable and secure grip during your rides.
-
Seat Cushion: The seat cushion is made with a brand new plastic seat plate, high elastic foam, advanced anti-slip material, and an sleek appearance. Its proper seat height ensures a comfortable riding experience even during long journeys.
-
Intelligent Charger: The E-Riderrs comes with an intelligent charger designed with a fully automatic portable design. No monitoring is required during charging, and it can be charged using a standard 220V AC power supply.
Main Technical Parameters: Now let's take a look at the key technical parameters of the E-Riderrs electric bike:
Main Technical Parameters of the Complete Vehicle:
- Overall dimensions: 69.3" x 27.6" x 47.2"
- Wheelbase: 51.0"
- Seat height: 27.6"
- Complete vehicle weight: ≤88.2 lbs
- Tire specification: 18x9.5-8
- Maximum load capacity: 350 lbs
- Designed maximum speed: ≤28 mph
- Driving mileage: 12 or 30 miles
- Maximum torque: 70.13 lb-ft
- Maximum gradeability: ≤20°
- Brake performance (12.4 mph speed): Dry state: ≤3.3 ft; wet state: ≤9.8 ft
Main Technical Parameters of the Storage Battery:
- Battery type: Power lithium battery
- Capacity: 12Ah and 20Ah options
- Nominal voltage: 60V
Main Technical Parameters of the Motor:
- Motor model: Brushless DC hub motor
- Rated power: 1500W
Main Technical Parameters of the Controller:
- Current limiting protection value: ≤25±1A
- Undervoltage protection value: 52±0.5V
Main Technical Parameters of the Charger:
- Input voltage (AC): AC140~240V 50/60Hz
- Output voltage (DC): 71.4±0.4V
- Charging time (depending on residual electricity): 4-6h
Note: The above parameters are subject to change without further notice.
Operation Methods and Precautions: To ensure a safe and enjoyable riding experience, please follow these precautions while using your E-Riderrs:
Precautions for Safe Driving:
- Always follow traffic rules and ensure safe driving. Maintain a safe speed within the recommended range.
- Before riding, familiarize yourself with this user manual and practice in an empty area. Fully understand the driving essentials, the bike's structure, and its performance, as this is crucial for safe driving.
- Do not lend the electric bike to inexperienced riders or those who cannot operate it safely. Single-hand driving, releasing the handlebar, or driving under the influence of alcohol is extremely dangerous.
- Exercise extra caution while riding in rainy and snowy conditions, as damp ground can lead to hazards. Avoid high-speed driving and be cautious when making turns. Always brake in advance during rainy and snowy weather to prevent accidents.
- Use a helmet correctly by wearing it on your head and fastening the straps securely while riding.
- Wear appropriate clothing that allows free movement, with closed cuffs and low-heeled shoes for safety. The frame number and motor number are marked on the automobile to facilitate maintenance and better service from the distribution unit.
Correct Operation Method:
Driving Method:
- Maintain a natural posture while driving for a comfortable experience.
- If driving while seated, sit in the middle of the seat cushion to avoid potential hazards due to front-wheel load reduction and handlebar vibration.
- If driving while standing, accelerate slowly to maintain stability and prevent instability due to sudden acceleration.
- Drive slowly on damaged roads or roads paved with crushed stones for a smoother ride.
- Exercise caution and drive slowly during wet conditions caused by rain or snow, as it may lead to sliding. Avoid riding in accumulated water to prevent damage to electrical components.
Parking Method:
-
When parking, please pay attention to vehicles and pedestrians around. Slowly park the electric bike on the right side of the flat pavement; do not park on the ramp.
-
After the electric bike is stably parked, turn the power lock rightwards and remove it. Then, lock the electric bike securely with locks.
- Switch on the lock, and the voltage indicator lamp will illuminate. In case of full charging, the battery indicator will be completely filled. As you operate your E-Riderr, you will notice that the bar goes down indicating that your battery is not fully charged.
- Brake clearance adjustment: Use a 2mm internal hexagonal wrench (between the brake handle and the handlebar tube) to adjust the gap between the brake pad and the brake disc until you have a comfortable hand feeling.
- Brake pad replacement: Replace the brake pad every six months, if its wear exceeds 1mm, or if the brake pad adjusting screw on the brake handle cannot be adjusted. To replace the brake pad, press one brake pad with a clean slotted screwdriver to empty the space and insert another piece. After replacement, adjust the brake pad adjusting screw on the brake handle to the proper position (where you have a comfortable hand feeling).
- Running-in period: Allow for a certain time for the running-in of the disc brake surface. After complete running-in, the brake force will noticeably increase. During the first week, avoid forcibly applying the brake to prevent irreversible damage to the brake pad and brake. Instead, slightly engage the brake for normal driving and maintain proper friction between the brake pad and the disc brake disc.
- Oil change: Use mineral oil for the disc brake. If you feel brake handle fatigue, change the oil (usually every 2~3 years) using an injector suction pipe.
-
b. Precautions for Disc Brake:
- Do not apply lubricating oil to the disc brake disc, brake pad, or places near calipers. Avoid touching the disc brake disc and brake pad surface directly with your hand, as it may significantly reduce brake performance.
- Do not spray water on the new brake to prevent polluting the brake pad with lubricating oil in the assembly gap.
- The oil pressure disc brake has strong brake force; practice in a safe place to adapt to its differences from common brakes. Avoid forcibly applying the brake to prevent injury due to uncontrolled wheel locking.
-
a. Operation Method:
- During charging, insert the battery box plug first, and then insert the commercial electricity AC220V plug. After charging, remove the commercial electricity AC220V plug first, and then remove the battery box plug.
- The charger indicator lamp will show red during normal charging and green after full charging.
- If the charging temperature is too high, the red lamp will flash, indicating a temperature protection state. In such a case, move the charger to a cool and ventilated place. Normal charging will resume when the internal temperature reaches 60°C.
- If no battery is connected during use, the charger output is a pulse voltage smaller than 42V. You can test the actual charging voltage of the charger by applying a 1KΩ resistance load between the positive and negative output terminals.
-
b. Precautions for Charger:
- Use the charger indoors only.
- Avoid charging in sealed spaces or under direct sunlight and high-temperature environments. Do not place the charger in the seat cask or trunk while charging.
- Do not connect the noload charger with AC power supply for an extended period under uncharging conditions.
- If the indicator lamp is abnormal, emits a smell, or if the charger shell overheats during charging, immediately stop charging and have the charger repaired or replaced.
- Do not remove or replace any device in the charger without permission.
- Charge only rechargeable batteries.
- Avoid using the charger in a combustible gas environment, as it may cause an explosion or fire.
- Keep the charger away from water or moisture to prevent fire or electric shock.
- If the charger is damaged and internal parts are exposed due to collision, do not touch it by hand to avoid electric shock.
Battery Operation Method and Precautions:
a. Charging:
- Be sure to use the specially equipped charger for charging. Using an irregular or unqualified charger may shorten the battery service life or cause it to fail.
- The completely discharged battery can be charged by more than 95% within 5 hours and 100% within 8 hours.
- During charging, avoid direct contact between the positive and negative terminals with metal.
- When receiving the product, charge the new electric bike for 3~10 hours before use.
- If the electric bike is not used for more than 1 month, the battery charge capacity may reduce by about 5%. It is recommended to charge it before use.
- Charge the battery timely to ensure the driving mileage.
- The charger will become hot during charging, which is normal if the temperature is not higher than 60°C.
- Keep the charger and the electric bike in a stable and dry place without inflammable and explosive articles, out of the reach of children during charging.
- Charge the battery within 24 hours after complete discharge, and the charging time should not be shorter than 3 hours.
- Do not short circuit the charging port.
b. Discharging (Use):
- The battery is designed exclusively for this type of electric bike and should not be used for any other purpose; doing so will void the warranty.
- In the event of a short circuit, the battery management system will automatically protect itself, and the fuse piece in the series-wound power lines will fuse, providing double protection for your battery. After a short circuit is resolved and the fuse piece replaced, the battery will resume normal functioning within about 2 minutes.
- Any damage or improper configuration of the controller, motor, horn, or lighting equipment of the electric bike may cause a large current discharge from the battery. In such cases, the battery will protectively stop output but will recover within 10 seconds, ensuring it doesn't affect your riding experience.
- The battery operates within a temperature range of -10°C to 55°C, similar to other batteries. With decreasing temperatures, the battery's energy use will naturally be reduced.
- Avoid short-circuiting the discharge port.
c. Storage:
-
For prolonged storage (over 1 month), it is advisable to charge the battery to approximately 60% to 80%. Additionally, recharge the battery every three months during the storage period and recharge it before using it again.
-
Store the battery in a cool and dry environment.
-
Do not directly connect the positive and negative electrodes of the battery during storage.
-
Keep the battery away from fire sources.
-
Never disassemble or retrofit the battery.
Warning:
-
If you notice any deformation or excessive heat from the battery, discontinue its use immediately and seek assistance from the company or maintenance department.
-
In case of a fire, avoid extinguishing it with water. Instead, use sand covering, a foam fire extinguisher, thick fabric saturated with water, or other suitable fire extinguishing methods for organic solvents.
-
Warranty will not cover battery faults caused by delayed charging of an incompletely discharged battery.
-
Never discard the battery randomly. Dispose of it properly following local regulations.
Checking, Cleaning, and Maintenance:
Perform regular or daily checks as follows:
-
Ensure you check the electric bike in a safe position.
-
Examine if any abnormal positioning from the previous day may affect its operation.
-
Check the brake effectiveness: Ensure the brake handle can be moderately applied, the gap is appropriate, and that it functions normally.
-
Inspect the tires for cracks, damage, abnormal wear, or any embedded objects like metal, stone, or glass. Verify the tire groove depth and replace the tire if the bump is worn out by 2/3. Maintain the normal pressure value of both front and rear tires at 1.5 kg/cm².
-
Verify that the power supply voltage indicates a complete charge
-
Conduct a steering system check: Assess the upper, lower, front, rear, left, and right rolling handlebars and front fork for moderate elasticity and flexible steering. Check for any clattering sounds or signs of looseness, knocking sounds, or other issues with the steering system. In case of any problems, contact the dealer for appropriate after-sales service.
-
Check the front and rear axles for any looseness.
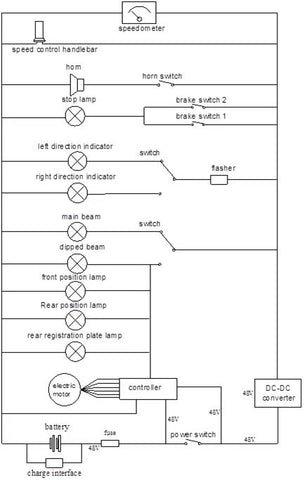
Electric Principles